Image Segmentation: Annotations to Binary Masks
Convert annotations contained in xml file to a binary mask in jpeg format
I am highly interested and passionate about AI and how it can be used to create an impact. I am always open to discuss ideas and to have a conversation, so feel free to leave me a message on any of my social media accounts.
Introduction
Image segmentation is similar to image classification such that a single or multiple classes are assigned to an image. However for the segmentation task, classes are assigned to each pixel of the image. Hence, a deep learning model performing an image segmentation task aims to identify each pixel that belongs to a class. There are a multitude of use cases for this task, such as its application in medical imaging, automation industry, satellite imaging, etc. This article will delve into the field of medical imaging and work with a dataset[1] that contains tissue images of tumors pertaining to different organs. The dataset article[1] was published in IEEE Transactions on Medical imaging in 2017 and the code for that article was published on this website.
The code presented in this post demonstrates how to convert pixel-wise annotations contained in an xml file to binary masks. The code demonstrated below is modified from this GitHub repo which is based on 2021 article[2] published in IEEE Transactions on medical Imaging. Figure 1 shows an example image on the left and the generated mask on the right.
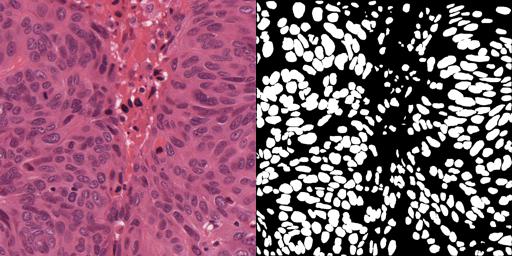 Figure1: Original Image[1] and generated mask.
XML Annotations
To read the relevant data required for the generation of the masks, the code must read each Vertex nodes in the xml file. To reach the vertex node, the code must traverse through the following node structure: Annotation > Regions > Region > Vertices > Vertex. This can be seen in Figure 2, which is an example of the data contained in the xml files.
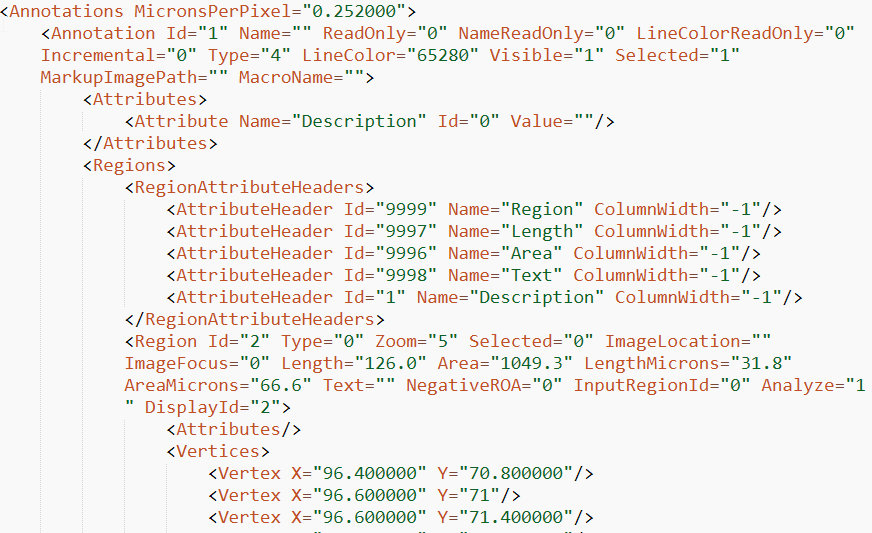 Figure 2: Sample xml file containing the required data for mask generation[1].
Code Description
Firstly, all the required libraries are needed to be imported. For this task, the os library is used for traversing the folders. The numpy library is used for data manipulation. Open-cv is used for reading the image. Skimage is used to draw the polygons for the binary masks. The xml library is used to read and traverse through the xml fields, and lastly tqdm library is used for displaying a progress bar.
import os
import numpy as np
import cv2
from skimage import draw
import xml.etree.ElementTree as ET
from tqdm import tqdm
After the libraries are imported, variables are set pertaining to the paths of the image data, the xml annotations and the output path for the masks.
image_path = './MoNuSeg 2018 Training Data/MoNuSeg 2018 Training Data/Tissue Images' # Path to save binary masks corresponding to xml files
data_path = './MoNuSeg 2018 Training Data/MoNuSeg 2018 Training Data/Annotations' #Path to read data from
destination_path = './MoNuSeg 2018 Training Data/MoNuSeg 2018 Training Data/Masks' # Path to save binary masks corresponding to xml files
After that, names of all the xml files are read and stored in the annotations variable.
annotations = [x[2] for x in os.walk(data_path)][0] #Names of all xml files in the data_path
For each annotations file, the file is parsed and the code traverse through the nodes and reads all the coordinates for the mask. A polygon is drawn based on the mask coordinates and the final generated mask is saved in the output directory.
for name in tqdm(annotations):
    tree = ET.parse(f'{data_path}/{name}')
    root = tree.getroot()

    child = root[0]
    for x in child:
        r = x.tag
        binary_mask = np.transpose(np.zeros((1000, 1000)))

        if r == 'Regions':
            for y in x:
                y_tag = y.tag

                if y_tag == 'Region':
                    regions = []
                    vertices = y[1]
                    coords = np.zeros((len(vertices), 2))
                    for i, vertex in enumerate(vertices):
                        coords[i][0] = vertex.attrib['X']
                        coords[i][1] = vertex.attrib['Y']
                    regions.append(coords)

                    vertex_row_coords = regions[0][:,0]
                    vertex_col_coords = regions[0][:,1]
                    fill_row_coords, fill_col_coords = draw.polygon(vertex_col_coords, vertex_row_coords, binary_mask.shape)
                    binary_mask[fill_row_coords, fill_col_coords] = 255

            mask_path = f'{destination_path}/{name[:-4]}.jpg'
            cv2.imwrite(mask_path, binary_mask)
Conclusion
Image segmentation is a field in Computer Vision that has wide impact on a lot of areas. Generating masks for the images is one of the first steps towards building a segmentation pipeline. This article shows how to take annotations in a xml file and convert them to binary masks, and one of the use cases in Medical Imaging.
References
[1] N. Kumar, R. Verma, S. Sharma, S. Bhargava, A. Vahadane and A. Sethi, "A Dataset and a Technique for Generalized Nuclear Segmentation for Computational Pathology," in IEEE Transactions on Medical Imaging, vol. 36, no. 7, pp. 1550-1560, July 2017, doi: 10.1109/TMI.2017.2677499.
[2] R. Verma et al., "MoNuSAC2020: A Multi-Organ Nuclei Segmentation and Classification Challenge," in IEEE Transactions on Medical Imaging, vol. 40, no. 12, pp. 3413-3423, Dec. 2021, doi: 10.1109/TMI.2021.3085712.